Rootless container builds on Kubernetes
An important task in most teams’ pipelines is building container images. Developers need their builds to be fast, reproducible, reliable, secure and cost-effective. The most isolated setup one can have in a cloud environment is running builds in an isolated server physical or virtual. Spinning new virtual machines (or physical in some cases) is quite easy in cloud environments, but it adds a lot of overhead, provisioning, monitoring, resource usage etc. On the other hand, running builds on a shared host can be insecure in non-trusted environments. Traditionally, dockerd had to be run as root or with root privileges and access to the docker socket was the same as being root. Podman had the same requirements initially as well. In a shared environment (a shared linux host), the most secure option is to run everything as non-root, for additional isolation user namespaces can also be used.
“In Kubernetes v1.33 support for user namespaces is enabled by default!”, this was a big announcement from the cloud-native community earlier this year. Not just because of the feature availability, it has been in beta since v1.30, but because of the maturity of the tooling around it. Improvements had to be made in the Linux Kernel, containerd, cri-o, runc, crun and Kubernetes itself. All this work improved the capabilities of these tools to run workloads rootless.
In this post, we will present 3 options (podman/buildah, buildkit and kaniko) for building container images in Kubernetes pods as non-root with containerd 2.x as runtime. Further improvements can be made using kata-containers, firecracker, gvisor or others but the complexity increases and administrators have to maintain multiple container runtimes.
Podman and Buildah
Podman is a tool to manage OCI containers and pods. Buildah is a tool that facilitates building Open Container Initiative (OCI) container images. Podman vendors buildah’s code for builds, so we can consider it the same. Both CLIs resemble the docker build CLI, and they can be used as drop-in replacements in existing workflows.
To run podman/buildah in a pod we can create an emptyDir volume to use for storage and set a limit to it and also point the run root directory to that volume as well. Then we can runAsUser 1000 (the podman/buildah user in the respective images).
Here is the storage configuration (upstream documentation: storage.conf):
[storage]
driver = "overlay"
runroot = "/storage/run/containers/storage"
graphroot = "/storage/.local/share/containers/storage"
rootless_storage_path = "/storage/.local/share/containers/storage"
[storage.options]
pull_options = {enable_partial_images = "true", use_hard_links = "false", ostree_repos=""}
[storage.options.overlay]
For both buildah and podman we need to configure storage with the overlay
storage driver for good performance. vfs is also an option (driver = "vfs")
but it is much slower especially for big images. Linked are the full manifests
for buildah and podman.
We need the following options:
- place storage.conf in
/etc/containers/storage.confor~/.config/containers/storage.confand mount an emptyDir volume in/storage, we can also configure a size limit... volumeMounts: - name: storage mountPath: /storage - name: storage-conf mountPath: /etc/containers/ volumes: - name: storage emptyDir: sizeLimit: 10Gi - name: storage-conf configMap: name: storage-conf - disable host users to enable user namespaces and run as user
1000... spec: hostUsers: false containers: - name: buildah securityContext: runAsUser: 1000 runAsGroup: 1000 ... - finally build with:
buildah/podman build -t example.com/image:dev .
Buildkit
Buildkit is a project responsible for building artifacts and it’s the project behind the docker build command for quite some time. If you’re using a recent docker you are already using buildkit. docker buildx is a CLI plugin to add extended build capabilities with BuildKit to the docker CLI. Apart from the docker CLI, buildctl and nerdctl can be used against buildkit.
Here is the full example with buildkit based on the upstream example.
To build with buildkit we need to:
- use the buildkit image
docker.io/moby/buildkit:masteror pin to a version egdocker.io/moby/buildkit:v0.23.1 - mount a storage volume (similar to buildah/podman) and specify the storage
directory
BUILDKITD_FLAGS="--root=/storage"... volumeMounts: - name: storage mountPath: /storage volumes: - name: storage emptyDir: sizeLimit: 10Gi - run privileged but with host users disabled
... spec: hostUsers: false containers: - name: buildkit securityContext: # privileged in a user namespace privileged: true ... - for standalone builds we can use buildctl-daemonless.sh a helper script
inside the image
buildctl-daemonless.sh \
  build \
  --frontend dockerfile.v0 \
  --local context=/workspace \
  --local dockerfile=/workspace
We can not use buildkit rootless with user namespaces, rootlesskit needs to be
able to create user mappings. User namespaces can be used with rootful
buildkit, where root is mapped to a high number user, so not really root or
privileged on the host. Here is the rootless upstream
example,
it needs --oci-worker-no-process-sandbox use the host PID namespace and procfs (WARNING: allows build containers to kill (and potentially ptrace) an arbitrary process in the host namespace).
Instead of using buildctl-daemonless.sh or just buildctl, the docker CLI can be used.
docker CLI full example:
cd /workspace
docker buildx create --use --driver remote --name buildkit unix:///path/to/buildkitd.sock
docker buildx build -t  example.com/image:dev .
Kaniko
Kaniko is a tool to build container images from a Dockerfile, inside a container or Kubernetes cluster. Kaniko is stable for quite some time and works without any storage configuration in kubernetes pods. Recently the project was deprecated by Google, but Chainguard is stepping up to maintain it. The debug tags of kaniko’s image contain a shell which is handy for CI pipelines.
To build with kaniko we do not need to mount any volumes for storage. Here is the full example with kaniko.
/kaniko/executor \
  --context /workspace \
  --dockerfile Dockerfile \
  --destination example.com/image:dev \
  --no-push
Performance and resource consumption
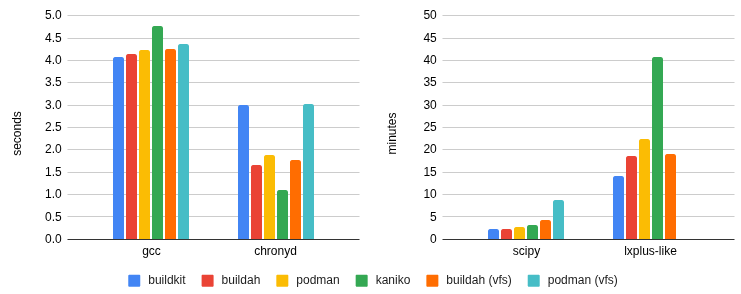
To compare the performance between all tools and try to spot differences, 4 build examples follow.
- gcc based on alpine:latest
- chronyd based on alpine, upstream project.
- jupyter notebook scientific python stack (scipy), upstream project.
- a CERN development environment based on Alma Linux (lxplus), which includes tools like: python, root.cern, HTcondor CLI, kubectl, helm, nvidia cuda toolkit, infiniband and others. Its size is ~35GB/20GB un/compressed, unfortunately it is an internal project.
The builds for gcc and chronyd take less than 5 seconds for all tools. Comparing resource consumption does not add any value. Especially for CIs, the build job may take longer to start or get scheduled.
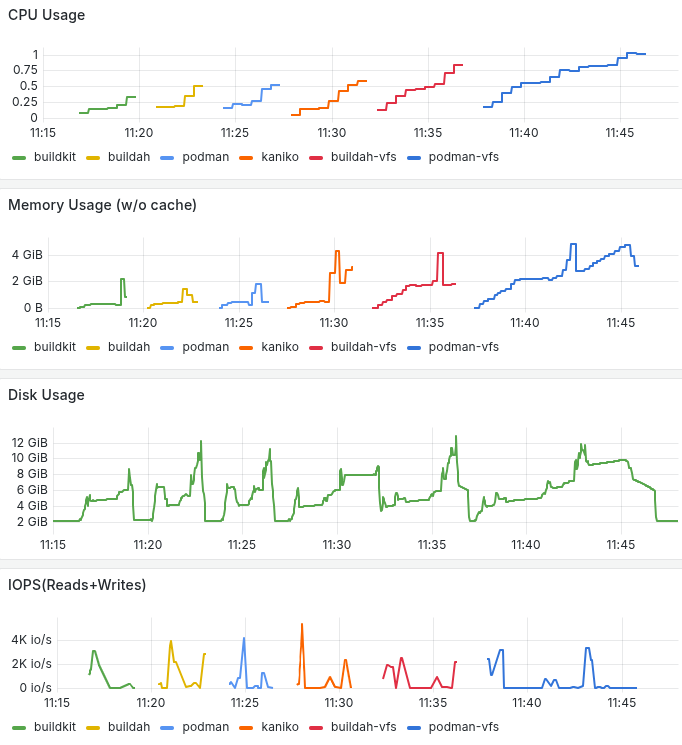
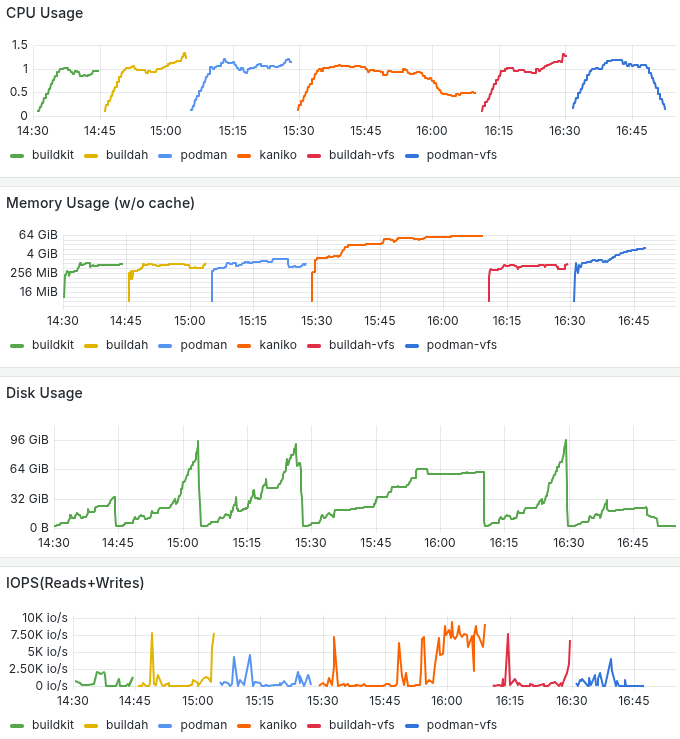
Moving on to build scipy and lxplus which are bigger images with a lot more files we start to see significant differences in build time and resource consumption. Buildkit and buildah/podman configured with overlayfs and overlay respectively, give faster build times, lower memory consumtion and better disk utilization. For the largest image, buildkit’s disk usage efficiency stands out. Below you can go through the build times and resource consumption based on kube-prometheus-stack.
Build time per experiment and per tool:
Pod resource consumption building scipy-notebook.
Pod resource consumption building CERN development environment.
Conclusion
With several improvements being done in past years, building containers as non-root has become much easier. All the mentioned tools provide similar functionality like caching. But which tool to choose?
- For all tools container images are available and good documentation is available.
- For most use cases, the build tool does not matter and the result is the same.
- Buildkit and buildah/podman are fast and do not consume a lot of resources (CPU/RAM). Kaniko has a different approach, for large images it may consume a lot of memory and it can be slower.
- Buildah/podman are daemonless and packages are available in most linux distributions and brew.
- In many open-source projects docker (with buildkit) is used to build images and downstream users may want to use the same workflow.
- Buildkit seems to be more efficient on disk usage for larger images.
Bonus: Caching
When it comes to building images in a CI (gitlab-ci/github/…) for incremental changes, similar to a local development machine, users may want to use caching and not build all layers in every push. Buildkit relies on an OCI artifact for caching while buildah/podman and kaniko need a repository. In a registry where multiple levels are allowed (eg example.com/project/repo/subrepo1/subrepo2), users can try to nest the cache in the same repository. If docker.io is your registry, you need a dedicated repo for caching.
buildkit:
buildctl build \
--export-cache type=registry,ref=example.com/image:v0.1.0-cache1 \
--import-cache type=registry,ref=example.com/image:v0.1.0-cache1 \
--output type=image,name=example.com/image:v0.1.0-dev1,push=false \
--frontend dockerfile.v0 \
--local context=. \
--local dockerfile=.
# buildctl-daemonless.sh accepts the same options
buildah/podman:
buildah build \
-t example.com/image:v0.1.0-dev1 \
--layers \
--cache-to example.com/image/cache \
--cache-from example.com/image/cache \
.
docker:
docker buildx build \
-t example.com/image:v0.1.0-dev1 \
--cache-from type=registry,ref=example.com/image:v0.1.0-cache1 \
--cache-to type=registry,ref=example.com/image:v0.1.0-cache1 \
--push \
.
# --push can be omitted
# --push is equivalent to --output type=image,name=example.com/image:v0.1.0-dev1,push=true \
kaniko:
/kaniko/executor \
--context $(pwd) \
--dockerfile Dockerfile \
--destination example.com/image:v0.1.0-dev1 \
--cache=true \
--no-push
# --cache-repo=example.com/image/cache inferred